This is default featured slide 1 title

Go to Blogger edit html and find these sentences.Now replace these sentences with your own descriptions.

This is default featured slide 2 title

Go to Blogger edit html and find these sentences.Now replace these sentences with your own descriptions.

This is default featured slide 3 title

Go to Blogger edit html and find these sentences.Now replace these sentences with your own descriptions.

This is default featured slide 4 title

Go to Blogger edit html and find these sentences.Now replace these sentences with your own descriptions.

This is default featured slide 5 title

Go to Blogger edit html and find these sentences.Now replace these sentences with your own descriptions.

Showing posts with label Trik Dan Tutorial Windows 7. Show all posts

Saturday, October 20, 2012

Cara mengetahui software dan hardware yang compatible dengan Windows 7

Jika ingin menggunakan Windows 7, terkadang disaat ingin membeli software atau hardware kita bingung memilih software atau hardware apa yang harus dibeli. Misalkan saat akan membeli laptop atau komputer, pada brosur penjualan spesifikasi hardware-nya akan tercantum graphic card (vga), sound card, ethernet card, wireles network card (wifi), modem, dll.

Ada baiknya sebelum membeli hardware /komputer terlebih dahulu melakukan survey pada brosur penjualan komputer dan mencocokkannya dengan informasi yang ada di situs microsoft atau forum-forum komputer. Agar tidak menyesal setelah membeli komputer ternyata komputer sering bermasalah.

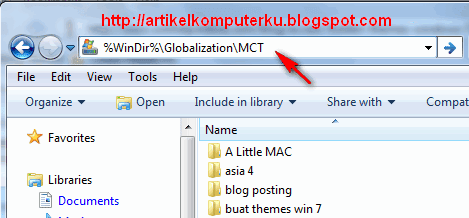
Untuk mengetahui hardware komputer yang sesuai (compatible dengan windows 7) bisa gunakan link berikut
Windows 7 Compatibility Center


Selain menggunakan link di atas jika ingin melihat laptop yang direkomendasikan oleh microsoft laptop untuk kebutuhan sehari-hari (Everyday PC) ,Entertainment , Gaming ,Professional ,Connected Companion bisa dilihat di bawah ini :

Gaming
Alienware M17x , Gateway LT3119u Netbook, HP Pavilion dv-6z, Alienware M11x, HP Pavilion DV6-3153NR Notebook, iBUYPOWER Battalion Touch CZ-10, Alienware M15x, ASUS G51JX-A1, Toshiba Qosmio X505-Q898

Everyday PC
Dell Adamo, Toshiba Satellite C650, Acer One 721-3070, Dell Inspiron M101z, Dell Inspiron M101z, Toshiba Satellite L635-S3030, Acer Aspire AS5740-6491, Lenovo ThinkPad L512, HP Pavilion dm4t, Gateway NV5914u, ASUS UL80Vt-A1, ASUS U43JC Bamboo, HP Envy 14, Sony VAIO EB, ASUS UX30-A1

Entertainment
Dell Studio XPS 16, HP G62t, HP G42-240US, Acer Aspire AS7740-5691, Dell Studio 15,Dell Inspiron M501R, HP Pavilion dv6T Select Edition, Lenovo IdeaPad Y560, Acer Aspire 7552, Samsung QX410, Sony VAIO EA, Dell XPS 14, ASUS UL50Vs-A1B, Sony VAIO F, Sony Vaio EC, ASUS N73JQ, HP Envy 17, Lenovo Y560d, Toshiba Satellite A665-3DV8


sumber : http://artikelkomputerku.blogspot.com/2011/01/cara-mengetahui-software-dan-hardware.html

Thursday, September 27, 2012

Merekam aktivitas di layar komputer menggunakan Snipping Tools Windows 7

 Jika di windows xp software screen capture belum tersedia sebagai aplikasi bawaan saat menginstal windows. Maka di Windows 7 terdapat sebuah aplikasi screen capture snipping tools yang dapat digunakan untuk merekam tampilan yang ada di layar komputer (desktop) dan menyimpannya menjadi gambar dengan format jpg. Namun snipping tools tidak terintegrasi pada semua versi windows 7. Snipping tools hanya tedapat pada Windows 7 Home Premium,Windows 7 Professional, dan Windows 7 Ultimate.


Seperti pada software screen capture lainnya misalnya irfan view, fscapture, dll, snipping tool menyediakan beberapa tipe perekaman yaitu:
a. Free-form Snip. Draw a free-form shape around an object. Merekam gambar yang tercakup dalam batas yang ditentukan oleh pengguna
b. Rectangular Snip. Drag the cursor around an object to form a rectangle.
Merekam gambar yang berada di dalam cakupan kotak hasil drag mouse
c. Window Snip. Select a window, such as a browser window or dialog box, that you want to capture.
Merekam tampilan windows tertentu yang sedang aktif di desktop
d. Full-screen Snip. Capture the entire screen.
Merekam seluruh tampilan layar komputer.

Selain tersedia tools untuk perekaman layar komputer, juga tersedia aplikasi image editor sederhana untuk mengedit gambar yang terekam


sumber : http://artikelkomputerku.blogspot.com/2011/02/merekam-tampilan-di-layar-komputer.html

Friday, September 21, 2012

Cara mengaktifkan aero themes di komputer yang tidak compatible dengan Aero Windows 7

Cara mengaktifkan aero themes di komputer yang tidak compatible. Windows 7 telah dilengkapi dengan fitur aero, fitur ini dapat mempercatik tampilan desktop serta dilengkapi dengan berbagai fitur animasi, slide show wallpaper, transparency dan berbagai efek dan fitur aero windows 7 lainnya. Namun kendalanya jika hardware komputer tidak mempunyai spesifikasi minimal untuk mendukung fitur aero maka secara otomatis aero tidak dapat diaktifkan di komputer/notebook.

Pada Windows 7 secara otomatis akan mengindeks hardware yang terpasang di komputer kemudian memberikan rating pada setiap hardware, semakin tinggi ratingnya maka semakin bagus spesifikasi komputer.

Syarat minimal hardware yang dibutuhkan untuk mengaktifkan aero di Windows 7 adalah:
1. Index (rating vga) minimal 3 (bisa di cek di system properties komputer)
2. VGA telah mendukung teknologi pixel shader 2
3. Memori minimal 1 GB.

Namun jika spfesifikasi hardware tidak memenuhi standar aero maka ada sebuah software gratis yang menurut pembuatnya dapat melakukan bypass saat windows mendeteksi hardware akan mengabaikan rating vga. Sehingga fitur aero dapat ditampilkan pada Windows 7 Home, Windows 7 Professional, Ultimate dan Enterprise.


Catatan:
Karena alasan stabilitas system maka windows tidak mengaktifkan aero pada komputer yang mempunyai spesifikasi hardware yang tidak mendukung Aero. Aero membutuhkan spesifikasi hardware yang tinggi. Jika tetap memaksakan maka ada beberapa kemungkinan yang akan terjadi pada komputer :
1.Windows akan sering hang dan lebih fatal harus diinstal ulang
2.VGA lebih cepat rusak karena over loading.
3.Windows 7 system requirements

Sebelum melanjutkan mengaktifkan Aero bisa baca referensi berikut :
1. Windows Slideshow
2. Aero Windows 7 Feature

Disana tercantum tulisan seperti di bawah ini :
Power User
If your graphics score isn’t at least 3.0, you can still get the full set of themes (with the Premium or Ultimate SKU) by setting a regkey. Keep in mind that there are no guarantees that they will run well!

Jadi masih bisa dipaksakan untuk menjalankan aero, namun sebagai gambaran sederhananya saya membuat perumpamaan seperti di bawah ini :
a. mobil kijang mewakili vga not support aero)
b. mobil truk mewakili vga support aero)
Jika anda hanya punya mobil kijang maka jangan paksakan mobil kijang anda untuk mengangkut muatan yang hanya layak diangkut oleh mobil truk. Jika dipaksakan maka mobil kijang akan peot dan cepat rusak.

Jika masih kurang percaya dengan informasi dari microsoft, dan gambaran sederhana mobil kijang tersebut maka ada beberapa cara untuk mengaktifkan secara paksa Aero pada windows 7

1. Melakukan pengeditan pada registry Windows (bisa dicari di google menggunakan link berikut Hack Enable Aero in Windows 7).
2. Dengan menggunakan software gratisan (tanpa edit registry)


Jika ingin mengaktifkan aero dengan software gratis bisa gunakan link berikut :

Enable Aero Windows 7
sumber : http://artikelkomputerku.blogspot.com/2011/01/cara-mengaktifkan-aero-themes-di.html

Monday, September 17, 2012

Cara menampilkan Themes Tersembunyi Windows 7

Selain themes bawaan windows 7, dan theme windows 7 yang tersedia di situs microsoft, ternyata ada themes tersembunyi windows 7. Themes ini ada beberapa macam yang terdiri dari themes australia, canada, great britain, United States, dan ZA. Themes tersebut bisa diaktifkan untuk menjadi koleksi themes yang sudah ada.

Untuk mengaktifkan Themes Tersembunyi Windows 7
1.Coba ketik teks berikut di addres bar Windows Explorer
%WinDir%\Globalization\MCT


2. Selanjutnya akan tampil beberapa direktori themes


 3. Buka salahsatu direktori themes
Klik themes AU untuk mengaktifkannya


4. Jika berhasil maka di personalize desktop themes akan muncul themes australia


Silahkan dicoba themes yang lain pada langkah 2 di atas.


sumber :  http://artikelkomputerku.blogspot.com/2011/01/cara-menampilkan-themes-tersembunyi.html

Monday, September 10, 2012

Cara Uninstall Windows 7 Language Interface Pack Bahasa Indonesia

Uninstal Windows 7 Language Interface Pack Bahasa Indonesia. Jika sudah menginstall windows 7 LIP di komputer namun kurang menyukai antar muka (interface) yang berbahasa Indonesia maka Windows 7 Language Interface Pack Bahasa Indonesia tersebut dapat diuninstall dari komputer agar tampilan interfacenya kembali ke keadaan semula yang menggunakan interface bahasa Inggris.

Untuk Uninstall Windows 7 Language Interface Pack Bahasa Indonesia, lakukan prosedur berikut:

1. Di start menu pilih Panel Kontrol


2. Akan terbuka Window Panel Kontrol
Pada bagian ikon Program pilih Membongkar program


3. Pada vertikal Menu pilih Jam Bahasa dan Wilayah
Pada bagian Daerah dan Bahasa , pilih Pasang atau bongkar bahasa tampilan


4. Pada window Install or uninstall display languanges , klik  uninstall display languanges


5.Akan terbuka tampilan window Install or uninstall display languanges  seperti di bawah ini
Di bagian Select the display languages you want to uninstall
Centang pada Indonesian (Bahasa Indonesia)
Klik tombol Berikutnya

6. Maka windows 7 akan memulai proses pembongkaran Windows 7 Language Interface Pack Bahasa Indonesia


7.  Tunggu hingga progress proses uninstall 100% . Akan muncul kotak dialog berikut, klik Restart now


Windows akan melakukan restart , ada saat booting beberapa konfigurasi yang akan dilakukan oleh windows, tunggu hingga konfigurasi dan windows akan menampilkan kotak login, login dengan akun anda jika proses uninstall Windows 7 Language Interface Pack Bahasa Indonesia berhasil maka tamiplan antar muka (interface) akan kembali normal dengan bahasa Inggris


sumber : http://artikelkomputerku.blogspot.com/2011/02/cara-uninstall-windows-7-language.html

Saturday, September 8, 2012

Microsoft memperkenalkan Windows 8 Preview ke publik

Microsoft mulai memperkenalkan sistem operasi terbarunya penerus Windows 7. Microsoft menamakan generasi berikutnya dari Windows ini ,dengan  internal kode-bernama "Windows 8,". Windows 8 merupakan "reimagining Windows from the chip to the interface". Sebuah PC berbasis Windows 8 adalah benar-benar jenis baru perangkat komputer dengan fitur layar sentuh yang dilengkapi dengan  kemampuan penyesuaian skala pada layar kecil berupa ubin-ubin (tile base screen).

Meskipun user interface baru ini dirancang dan dioptimalkan untuk layar sentuh (touch screen),  yang dapat diakses dengan atau tanpa menggunakan keyboard dan mouse.. User interface dan aplikasi baru ini akan bekerja pada berbagai ukuran layar dan kepadatan pixel, dari papan tulis kecil untuk laptop, desktop, all-in-one, dan bahkan kelas-ukuran display. Pendekatan baru ini memberikan lebih banyak pilihan pada pengguna untuk menggunakan apapun jenis perangkat yang diinginkan, dengan peripheral yang diiginkan, untuk menjalankan aplikasi di komputer anda. Hal ini pasti menginspirasi generasi baru perangkat keras dan pengembangan perangkat lunak, serta meningkatkan pengalaman bagi pengguna PC di seluruh dunia.


Beberapa fitur baru dari antarmuka Windows 8 antara lain:


a. Fast launching of apps from a tile-based Start screen. Lebih Cepat dalam menjalankan aplikasi dari layar tile-based (layar berbasis ubin), yang menggantikan menu Start Windows dengan tampilan,dan tampilan aplikasi disesuaikan dengan skala layar.
b.Live tiles with notifications, selalu menampilkan informasi yang up-to-date dari aplikasi anda.
c. Fluid, natural switching between running apps. Lebih cair dan perpindahan aplikasi yang lebih alami
d. Convenient ability to snap and resize an app to the side of the screen, Lebih nyaman dan mempunyai kemampuan untuk melakukan snap dan mengubah ukuran sebuah aplikasi ke sisi layar, sehingga anda benar-benar bisa menggunakan kemampuan multitask dari Windows.
e. Web-connected and Web-powered apps built using HTML5 and JavaScript. Optimasi Web-connected dan  dilengkapi dengan aplikasi web bertenaga yang dibangun menggunakan HTML5 dan JavaScript yang memiliki akses ke kekuatan penuh dari PC.
d. Fully touch-optimized browsing, with all the power of hardware-accelerated Internet Explorer 10. Penuh sentuhan dengan fitur browsing yang dioptimalkan , dengan semua kekuatan hardware-accelerated Internet Explorer 10.
e. Pengguna Windows 7 dapat dengan mudah mengupgrade OS ke Windows 8 tanpa perlu khawatrir dengan kompatibilitas perangkat lunak dan peripheral.

Berdasarkan informasi di situs micosoft belum ada bocoron tentang kepastian kapan windows 8 akan resmi diproduksi secara komersial. Namun kemungkinan akan dipasarkan pada akhir tahun 2012 atau awal 2013.


sumber : http://artikelkomputerku.blogspot.com/2011/07/microsoft-memperkenalkan-windows-8.html

Thursday, September 6, 2012

Cara mengganti skin windows media player

Secara default saat menginstal windows di komputer maka secara otomatis windows media player ikut terinstal sebakai aplikasi multimedia. Tampilan default skin panel windows media player berupa kotak dengan tampilan standard. Jika mempunyai koneksi internet maka anda bisa mengunduh skin windows media player, Beberapa situs yang menyediakan skin windows media player adalah situs resmi microsoft, dan berbagai situs penyedia skin lainnya.

Tampilan windows media player yang sudah diubah skinnya bisa dilihat di bawah ini


Untuk mengaktifkan skin windows media player, 
1. Download skin wmp di situs microsoft atau bisa gunakan link berikut skin windows media player
2. Simpan skin hasil download di direktori 
C:\Program Files\Windows Media Player\Skins

3. Pilih salahsatu skin yang telah terdownload
Double klik salah satu skin tersebut


4. Jika berhasil maka akan terbuka wmv dengan skin baru
Untuk mengembalikan skin ke kondisi semula
Klik kanan pada panel windows media player, pilih switch to full mode


5. Wmp akan kembali pada kondisi semula.


Beberapa skin yang tersedia di situs microsoft antara lain:


1. Age of Mythology ( (File size: 1.52 MB) Created by: The Skins Factory
2. Anemone ( (File size: 446 KB) Created by: Microsoft
3. Anime ( (File size: 409 KB) Created by: Saltmine LLC
4. AOE - Age of Empire ( (File size: 133 KB) Created by: Microsoft
5. Back to the Future Trilogy ( (File size: 1.56 MB) Created by: The Skins Factory
6. Batman Begins ( (File size: 13.2 MB) Created by: The Skins Factory
7. Blue Crush ( (File size: 1 MB) Created by: The Skins Factory
8. Blue Grid ( (File size: 41 KB) Created by: Microsoft
9. Cablemusic ( (File size: 340 KB) Created by: CableMusic Networks
10. Catwoman (File size: 3.86 MB) Created by: The Skins Factory
11. Cerulean (File size: 212 KB) Created by: Microsoft
12. Charlie's Angels: Full Throttle (File size: 851 KB) Created by: Petrol Designs
13. Circle (File size: 55 KB) Created by: Microsoft
14. Claw (File size: 101 KB) Created by: Microsoft
15. Color Chooser (File size: 3.5 KB) Created by: Microsoft
16. Combat Flight Simulator 3 (File size: 1.79 MB) Created by: The Skins Factory
17. Constantine (File size: 4.4 MB) Created by: The Skins Factory
18. Crystal Ball (File size: 815 KB) Created by: Microsoft
19. DeepBlueSomething (File size: 1 MB) Created by: The Skins Factory
20. Digital DJ (File size: 412 KB) Created by: Microsoft
21. DreamCatcher (File size: 2.76 MB) Created by: The Skins Factory
22. Ducky (File size: 115 KB) Created by: Wotch.com
23. Elvis (File size: 192 KB) Created by: BMG
24. Erektorset (File size: 188 KB) Created by: Saltmine LLC
25. Gadget (File size: 91 KB) Created by: Microsoft
26. Gnome (File size: 329 KB) Created by: Howard University
27. Gold (File size: 440 KB) Created by: ByteAudio
28. Goo (File size: 390 KB) Created by: Microsoft
29. Gorillaz (File size: 232 KB) Created by: EMI Parlophone
30. Half Life 2 (File size: 3.23 MB) Created by: The Skins Factory
31. Halloween (File size: 662 KB) Created by: The Skins Factory
32. Halo 2 (File size: 4.99 MB) Created by: The Skins Factory
33. Harry Potter (File size: 1.65 MB) Created by: The Skins Factory
34. iMusica (File size: 251 KB) Created by: iMusica.com.br
35. Kenwood (File size: 1.18 MB) Created by: The Skins Factory
36. Kids (File size: 137 KB) Created by: Saltmine LLC
37. Lara Croft Tomb Raider (File size: 934 KB) Created by: Petrol Designs
38. The Last Samurai (File size: 2.98 MB) Created by: The Skins Factory
39. Livin' It (File size: 7.53 MB) Created by: The Skins Factory
40. Lord of the Rings (File size: 4.86 MB) Created by: The Skins Factory
41. Main Street (File size: 198 KB) Created by: ByteAudio
42. Melvin (File size: 77 KB) Created by: Ed Averett
43. Military (File size: 395 KB) Created by: Saltmine LLC
44. Modern Blue (File size: 204 KB) Created by: Microsoft
45. MSN (File size: 105 KB) Created by: Microsoft
46. Nautical (File size: 1.45 MB) Created by: Saltmine LLC
47. Need For Speed Underground (File size: 4.95 MB) Created by: The Skins Factory
48. Ocean (File size: 294 KB) Created by: Microsoft
49. Pharaoh (File size: 197 KB) Created by: Microsoft
50. Polygon (File size: 60 KB) Created by: Microsoft
51. Portals (File size: 825 KB) Created by: The Skins Factory
52. Primitive (File size: 480 KB) Created by: Kevin Ng
53. RAD (File size: 51 KB) Created by: Microsoft
54. Radio (File size: 50 KB) Created by: Microsoft
55. Raptor (File size: 273 KB) Created by: ByteAudio
56. Science (File size: 612 KB) Created by: Microsoft
57. Scooby-Doo 2 (File size: 2.27 MB) Created by: The Skins Factory
58. Spider-Man (File size: 271 KB) Created by: Sony Pictures
59. Sports (File size: 330 KB) Created by: Saltmine LLC
60. Spring Flowers (File size: 106 KB) Created by: Ed Averett
61. Stealth (File size: 52 KB) Created by: Saltmine LLC
62. TDK (File size: 724 KB) Created by: The Skins Factory
63. Television (File size: 199 KB) Created by: Saltmine LLC
64. Terminator 3 (File size: 2.3 MB) Created by: The Skins Factory
65. Toothy (File size: 42 KB) Created by: Microsoft
66. Tube Frame (File size: 112 KB) Created by: Microsoft
67. Ursula (File size: 295 KB) Created by: ByteAudio
68. World of Warcraft (File size: 3.18 MB) Created by: The Skins Factory
69. Xbox (File size: 1.51 MB) Created by: The Skins Factory
70. Xbox Live (File size: 2.59 MB) Created by: The Skins Factory
71. XSN Sports (File size: 2.75 MB) Created by: The Skins Factory
72. xXx (File size: 1.54 MB) Created by: The Skins Factory
73. Zen Garden (File size: 161 KB) Created by: Ed Averett

Situs lain penyedia skin windows media player antara lain

http://www.skinz.org/


sumber : http://artikelkomputerku.blogspot.com/2011/10/cara-mengganti-skin-windows-media.html

Tuesday, September 4, 2012

Mengaktifkan dan menonaktifkan okozo flash wallpaper windows 7

Dalam postingan tentang mengaktifkan wallpaper animasi windows 7 telah tercantum cara mengaktifkan dan mengintegrasikan aplikasi okozo dan file animasi "interactive ants". Proses tersebut cukup sekali dilakukan. Untuk mengaktifkan wallpaper tersebut untuk kali kedua dan seterusnya, cukup dengan double klik shorcut Okozo Desktop yang ada di layar komputer.


Sedangkan untuk menonaktifkan wallpaper animasi okozo, cukup dengan klik kanan di desktop, kemudian pada popup menu pilih Okozo - Exit.
Maka secara otomatis wallpaper akan kembali ke tampilan default


sumber : http://artikelkomputerku.blogspot.com/2011/11/mengaktifkan-dan-menonaktifkan-okozo.html

Saturday, September 1, 2012

Check Windows 7 32-bit vs 64-bit

Sebelum menginstal aplikasi ke windows, yang perlu di perhatikan adalah kesesuaian antara sistem operasi dan software aplikasi yang akan diinstal ke windows. Dalam beberapa kasus terkadang sebuah installer aplikasi yang didistribusikan oleh pengembang software telah terpaket dalam dua versi untuk 32-bit dan 64-bit, sehingga saat menginstal aplikasi tersebut secara otomatis dapat terinstal pada windows 7 64-bit atau 32-bit. Namun terkadang ada juga aplikasi yang didistribusikan khusus untuk windows 7 32-bit atau khusus untuk 64 bit. Contohnya aplikasi okozo yang akan digunakan untuk memasang flash animasi di windows 7

Untuk mengetahui dan membedakan Windows 7 32-bit /64-bit yang terinstal di komputer bisa dengan menggunakan tools bawaan windows, yaitu directX diagnostic

1. Di kotak search ketik "dxdiag" (tanpa tanda petik) , kemudian tekan enter


Maka akan tampil window DirectX Diagnostic Tool
Pada tabulasi System, di bagian System Information akan terlihat :
Operating System : Windows 7 Ultimate 32-bit (6.1, Bulit 7600)


Jadi dengan bantuan DirectX Diagnostic Tool dapat diketahui sistem operasi yang terinstal di komputer adalah Windows 7 Ultimate 32-bit


sumber : http://artikelkomputerku.blogspot.com/2011/11/check-windows-7-32-bit-vs-64-bit.html

Wednesday, August 22, 2012

Free Tutorial Microsoft Virtual PC for Windows 7

Free Download Ebook panduan penggunaan Microsoft Virtual PC di Windows 7. Microsoft Virtual PC adalah sebuah aplikasi yang bisa dijalankan pada Windows 7 Professional, Windows 7 Ultimate, dan Windows 7 Enterprise, selain untuk Windows 7 juga terdapat aplikasi Virtual PC untuk Windows Vista dan Windows XP. Dengan menggunakan Microsoft Virtual PC kita dapat menjalankan beberapa sistem operasi secara simultan, dengan terlebih dahulu mengaktifkan virtual PC.

Berikut ini adalah isi ebook yang mencakup tutorial penggunaan Microsoft Virtual PC pada Windows 7:


A. Info for existing users of Microsoft Virtual PC include:


1.The new features in Windows Virtual PC:

• Windows Virtual PC is supported only on Windows 7 host.

• USB 2.0 support in virtual machines (“VM”).

• Windows XP Mode ‐ Virtualized applications running in a VM run seamlessly on

2. Windows 7 desktop as if they were native Windows 7.

• Auto publishing of virtualized applications running in a VM to Windows 7.

• Multithreading‐ Each VM runs in its own thread.

• Support for higher resolution, support for Direct X in Windows 7 & Windows

3. Vista VMs.

• Integrated with Windows 7 Explorer shell and Super Bar features.

• Simplified UI.

• Support for DEP/NX in VMs.

• Support for EPT/NPT for VMs.


B. Set up and Install

a.Special Hardware requirement

• Windows Virtual PC requires a CPU with the Intel® Virtualization Technology or AMD‐V® feature turned on (enabled in the BIOS).

b. How to enable processor virtualization extension

c. Installation of Integration Components (ICs)

• “Integration Components” run inside the guest VM and communicate directly with the operating system on the host computer.

C. Windows XP mode

Windows XP Mode is a pre‐activated copy of Windows XP SP3 in VHD file format. Forlicensed users of Windows 7 Professional, Ultimate or Enterprise editions, Virtual Windows XP makes it easier for users to adopt Windows Virtual PC as a solution for application compatibility. To make the user experience easier, a “sysprepped” andcompressed Windows XP SP3 VHD is available from the Download Center at www.microsoft.com. The VHD simplifies installation and setup of Windows XP Modewith minimum user intervention.


D. Virtual Application

1. Virtual application publishing

“Virtual application” as used here refers to an application installed within a VM that can run in a seamless way as if the application were installed on the host computer’s operating system. The user would not necessarily be aware of the existence of

2. Underlying VM on which the application is running.

Links to the virtual application get published to the start menu of Windows 7. Filesresiding on Windows 7 host computer get associated with these remote applications.

The published Virtual applications are sometimes referred to as “RAIL‐ed” applications. RAIL stands for “remote application integrated locally.”

The user can publish many applications in a VM. The launching of the first virtualapplication in a VM takes longer due to the time needed to start and login to the VM.

E.Networking in VMs

1. Network options available in VM

In virtual machine settings, you can specify up to four (4) emulatedadapters. You can assign each emulated adapter card to any netwinstalled on the physical computer. The various adapter options are:

• Not connected: With this option, networking is not available in VM.
• Internal Network: This option provides networking between VMs on
• Shared Networking (NAT): This is a virtual NAT (network address that allows the virtual machine to leverage the external TCP/IP connected to the Windows 7 host.
• Network Adapter on host: (Note‐This option appears as Name of a the drop down). This is also known as Bridged mode. When this selected, the virtual machine is connected directly to the selected connection of the Windows 7 host. The virtual machine will apbehave like a separate physical computer on the same network
system has wireless adapter, its name will appear in dropdown list.

F.VM Creation & Management

Change Settings of the Virtual Machine

Change the RAM allotted to virtual machine

Restart option is missing from Start menu in VM. How do I restart?

Entering Pre‐Boot environment (BIOS screen/network boot)

Shutdown down a VM

PXE installation of OS in a VM

Renaming a VM

Moving a VMC, VHD or VMCX file

Deleting a VMC, VMCX or VHD file

Adding additional disks in VM

Jika ingin mencoba ebook di atas bisa download disini tutorial Microsoft Virtual PC for Windows 7

Untuk menjalankan aplikasi Microsoft Virtual PC for Windows 7 dibutuhkan software Microsoft Virtual PC yang harus diinstal di komputer,setelah terinstal dikomputer anda bisa mengetik vitual pc di kotak search windows , selanjutnya gunakan ebook panduan di atas untuk mengenal dan mempraktekkan fitur-fitur dan fasilitas yang ada dalam software Microsoft Virtual PC


 sumber : http://artikelkomputerku.blogspot.com/2011/10/free-tutorial-microsoft-virtual-pc-for.html

Tuesday, August 14, 2012

Menampilkan frame photo slide show di desktop komputer

Jika ingin menampilkan slide show gambar-gambar kesukaan atau foto-foto pribadi di desktop komputer, salah satu cara yang bisa digunakan adalah dengan menggunakan software gratis photo frame. Kelebihan software ini adalah gambar/foto dapat tampil di dalam gadget yang terletak di pojok kanan bawah, saat membuka sebuah window aplikasi seperti misalnya microsoft excel, dll , maka gadget slideshow tersebut akan tampil di depan window aplikasi ms excel yang aktif, sehingga secara langsung anda dapat melihat slideshow tersebut. Jika menggunakan slideshow themes maka gambar akan terlihat saat window aplikasi di desktop di close/minimize.

Software ini dapat digunakan di windows XP maupun Windows 7. Untuk memasang photo frame slideshow di komputer bisa ikuti prosedur berikut:


1. Download software photoframe dengan menggunakan link berikut photo frame


2. Setelah terinstal di komputer, buka aplikasi photo frame
Double klik di dalam kotak frame area untuk menampilkan window photo frame seperti gambar di bawah.
Pada Tabulasi "Select Frame", pilih salah satu frame yang akan digunakan, dalam contoh ini digunakan frame Baguette
Klik OK


3. Selanjutnya pilih tabulasi Select photo
Pilih option Slide show
Pada bagian directory photos : klik tombol browse (titik tiga) untuk memilih direktori/folder yang berisi gambar yang akan ditampilkan
Di bagian Change picture atur interval slide show, dalam contoh di bawah, gambar akan diubah secara otomatis setiap 5 menit (every 5 minutes)
Klik OK

4. Jika pengaturan frame slideshow berhasil, maka akan tampil frame di pojok kanan bawah layar komputer, seperti di bawah ini

Untuk menampilkanlebih dari satu gadget frame slideshow di desktop bisa buka aplikasi photoframe menggunakan shortcut link photoframe yang ada di desktop atau shorcut yang ada di start menu. Kemudian lakukan langkah 1 sampai 3 di atas.

Alternatif link

http://www.freewarefiles.com/Free-Photo-Frame_program_65026.html

http://download.freewarefiles.com/files/photoframe.zip


sumber : http://artikelkomputerku.blogspot.com/2011/09/menampilkan-frame-photo-slide-show-di.html

Monday, August 13, 2012

Cara install flash animation okozo di windows 7

Berhubung blog ini dikhususkan buat pemula, maka sebagai pelengkap tutorial tentang cara membuat wallpaper flash animation windows 7 saya sertakan panduan menginstal aplikasi flash animation wallpaper okozo secara sederhana dan tutorial ini diusahakan step by step yang diharapkan bisa mempermudah pengguna komputer pemula dalam mengaktifkan animasi flash menjadi wallpaper desktop yang unik dan menarik.

Untuk menginstal aplikasi desktop okozo silahkan ikuti prosedur berikut:
1.Download dan instal adobe flash player di komputer. Bisa download disini adobe flash player
Download installer okozo bisa gunakan link berikut okozo desktop
Perlu diperhatikan aplikasi okozo desktop tersebut tersedia dalam dua paket yaitu
a. Okozo Desktop 32-bit Installer untuk Windows Vista dan 7 versi 32 bit
b. Okozo Desktop 64-bit Installer untuk Windows 7 dan Vista versi 64 bit
Pilih installer sesuai versi bit windows anda. Untuk mengetahui windows 7 anda 32 bit atau 64 bit bisa dilihat panduannya disini check windows 7-32 bit/64 bit

2. Setelah mengunduh installer okozo desktop, double klik file installer tersebut, maka akan tampil kotak dialog Security Warning berikut " The publisher could not be verified. Are you sure you want to run this software"
Klik tombol Run


3. Selanjutnya tampil kotak dialog Okozo Desktop Setup "Welcome to the Okozo Desktop Setup Wizard"
Klik Next

4. Kemudian akan muncul kotak dialog "Okozo Desktop Setup : Nitro PDF Reader"
Aplikasi Nitro PDF Reader fungsinya sama dengan Adobe PDF Reader, yaitu untuk membaca file-file pdf,
Pilih Option "I do not want to install Nitro PDF Reader"
Klik tombol Install
5. Selanjutnya muncul kotak dialog berikut, silahkan dibaca dulu perjanjian "Okozo Desktop End User Licence Agreement"
Klik "I Agree"


6. Dan akan muncul kotak dialog Installing Microsoft(R) DirectX(R)
Pilih "I accept the agreement"
Klik Next

Catatan:
Untuk melakukan update Microsoft DirectX dibutuhkan koneksi internet, secara default komputer akan terkoneksi ke situs microsoft, selanjutnya akan di analisa oleh Microsoft DirectX engine untuk penyesuaian update file file side development kit dan file dll yang nantinya dibutuhkan untuk menjalankan aplikasi okozo

7. Akan muncul kotak dialog berikut yang berisi option untuk menginstal Bing Bar di browser anda.
Kosongkan saja box centang "Install the Bing Bar"
Klik Next

8. Secara otomatis komputer akan terhubung ke situs microsoft, selanjutnya situs microsoft akan mulai menganalisa directX yang ada di komputer, dilanjutkan dengan proses downloading component pendukung directX seperti DirectX Runtime Optional Components, DirectX SDK Update,  dan file-file dinamyc link library lainnya.


Proses ini butuh beberapa menit, sebagai contoh saya menggunakan Windows 7 Ultimate 32 bit dibutuhkan sekitar 35 menit untuk mengupdate directX Windows, dengan ukuran file update sekitar 48,2 MB.

9. Setelah proses update directX selesai, akan muncul kotak dialog "Instalation Complete" seperti di bawah ini
Klik Finish
10. Kemudian proses instalasi Okozo berlanjut seperti gambar berikut :
12. Okozo kembali melakukan analisa component pendukung lainnya yaitu "Microsoft Visual C++ 2010 x86 Redistributable Setup", jika component tersebut belum terinstal maka muncul kotak dialog berikut:
Centang box I have read and accept the license term
Klik tombol Install

11. Setelah proses instalasi selasai ,selanjutnya akan muncul kotak dialog berikut yang berisi pesan :
"Microsoft Visual C++ 2010 x86 Redistributable has been installed"
Klik tombol Finish

12.Selanjutnya akan muncul kotak dialog berikut "Completing the Okozo Desktop Setup Wizard"
Klik Finish

Sampai disini proses instalasi okozo di komputer sudah berhasil. Langkah selanjutnya melakukan aktivasi animation file dan setup configuration okozone themes.


sumber : http://artikelkomputerku.blogspot.com/2011/11/cara-install-flash-animation-okozo-di.html

Sunday, August 12, 2012

Cara menampilkan animasi wallpaper flash pada windows 7

Dalam postingan ini akan dibahas tentang cara menampilkan animasi wallpaper flash pada windows 7. Posting ini adalah merupakan kelanjutan dari postingan sebelumnya tentang cara menginstal okozo di windows 7.
Dengan anggapan okozo telah sukses anda instal di komputer, maka langkah selanjutnya adalah melakukan konfigurasi dan download file animasi yang akan dijadikan wallpaper

Prosedur yang harus anda lakukan adalah:

1. Buka situs okozo menggunakan link berikut okozo wallpaper
Pilih salahsatu file wallpaper flash yang tersedia, dalam contoh ini digunakan "Interactive ants wallpaper"


2. Akan terbuka halaman yang berisi link untuk download flash wallpaper tersebut
Klik tombol download
3. Setelah file flash tersebut terunduh, buka windows explorer
Pilih / double klik file interractive-ants


4. Jika file tersebut telah terintegrasi dengan aplikasi okozo desktop, maka akan muncul pesan berikut : "Wallpaper Successfully Loaded"
Klik OK

5. Untuk menjalankan aplikasi okozo, bisa dengan mengklik shorcut okozo yang ada di start menu, atau shorcut okozo pada desktop, dalam contoh ini saya menggunakan shorcut okozo yang ada di taskbar windows


6. Akan terbuka panel aplikasi okozo desktop, pilih Wallpaper - Cartoon - Insect , klik/doubleklik pada Insects untuk menampilkan Okozo Desktop Preview window


7. Pada Okozo Desktop Preview window, klik tombol Apply


8, Secara default ada10 semut yang tampil dan berkeliaran di desktop. Untuk menambah semut yang tampil di desktop, pada window Ant Configuration , klik panah segitiga atas pada Number of Ants untuk menambah jumlah semut yang akan ditampilkan di desktop komputer
Klik Save Setting

9. Selanjutnya di panel aplikasi okozo pilih Wallpaper - Display - Don't display On , centang Monitor 0

10. Jika sukses maka akan tampil semut-semut yang berjalan dan berlari di desktop komputer / notebook seperti gambar di bawah ini


Silahkan mencoba.


sumber :  http://artikelkomputerku.blogspot.com/2011/11/cara-menampilkan-animasi-wallpaper.html